If you have ever wanted to learn how to draw SpongeBob, you are in the right place. This article will teach you simple steps to draw SpongeBob SquarePants clearly and easily. Whether you are a kid, a beginner, or just curious, you can follow along and create your own SpongeBob drawing. We will explain everything in easy words, so anyone can understand.
SpongeBob is one of the most fun and popular cartoon characters to draw. His bright yellow color and happy face make him a favorite for many people. Drawing SpongeBob can be exciting because his shape is simple but full of personality. Plus, drawing him helps improve your skills with shapes and lines.
SpongeBob is a sea sponge who lives under the ocean in a place called Bikini Bottom. He has a square body that looks like a kitchen sponge, big round eyes, a long nose, and wears square pants with a tie. His friendly and silly nature makes him easy to love. Knowing these basic facts about SpongeBob will help you draw him better.
What You Need Before You Start Drawing SpongeBob
Before you begin your SpongeBob drawing, it helps to have some basic tools ready. You will need:
- A pencil for sketching your drawing
- An eraser to fix any mistakes
- Paper to draw on
- Colors such as crayons or colored pencils to bring SpongeBob to life
If you want to add more detail, you can also use markers to outline your drawing or color with brighter tones. For those who prefer digital drawing, apps like Procreate or Autodesk Sketchbook work well and let you erase and color easily.
One of the most important things to remember is to be patient. Drawing takes time and practice. If your first try doesn’t look perfect, that is okay. Keep trying and enjoy the process. Patience helps you learn and improve step by step.
Step-by-Step Guide to Drawing SpongeBob SquarePants
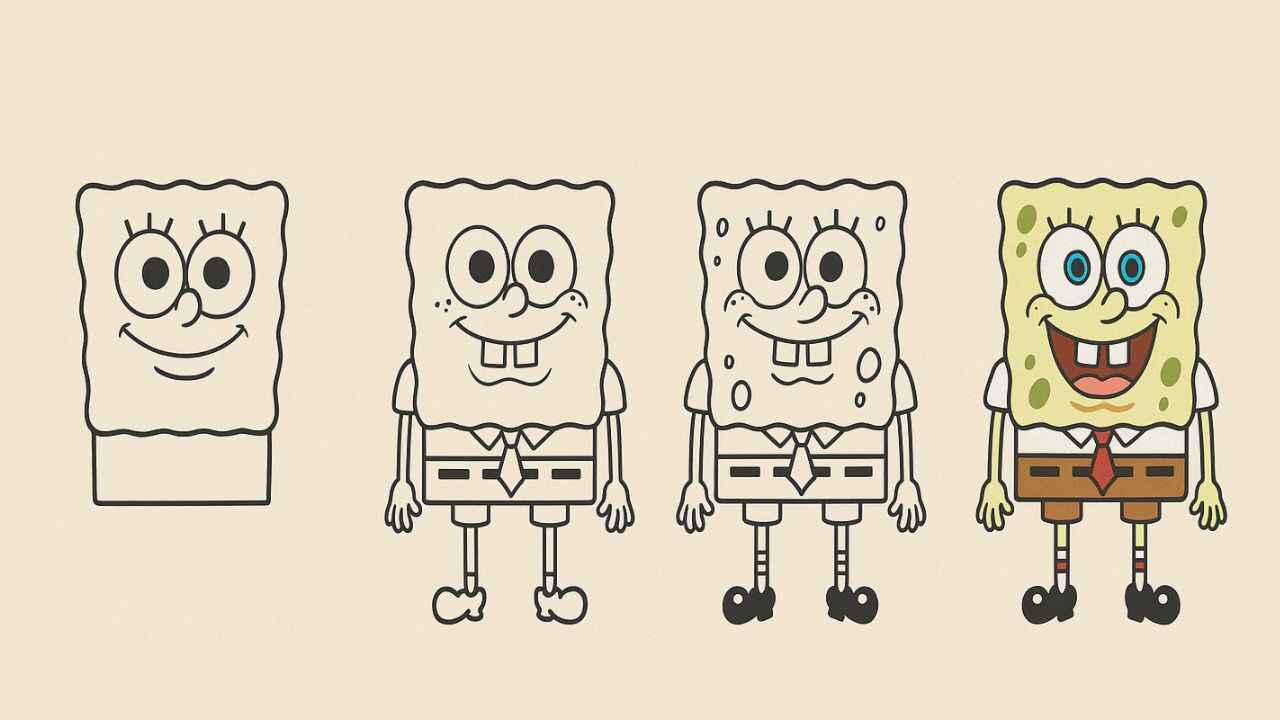
Step 1 – Draw SpongeBob’s Basic Shape
Start by drawing SpongeBob’s body as a tall rectangle with rounded corners. This shape looks like a kitchen sponge, which is what SpongeBob is based on. Make sure the rectangle is taller than it is wide, but not too narrow. Keep the corners soft and curved, not sharp, to match SpongeBob’s friendly look.
Tips to keep proportions right:
- Draw lightly at first so you can erase if needed.
- Use a ruler or straight edge to help with the sides.
- The height should be about twice the width.
Step 2 – Add His Big Eyes and Nose
Next, draw two large circles near the top of the rectangle for SpongeBob’s eyes. Space them evenly apart, leaving room between and around them. Inside each eye, add a smaller circle for the pupils. You can place the pupils looking slightly to one side to give SpongeBob a lively expression.
For the nose, draw a small, curved tube shape that sticks out between and just below the eyes. It should be longer than wide and point slightly downward.
Step 3 – Draw His Smile and Teeth
Below the nose, draw a wide smile using a curved line that stretches almost from one side of the face to the other. Inside the smile, add two small rectangle shapes for SpongeBob’s two front teeth, centered at the top edge of the mouth.
Add freckles on each cheek as three small dots. These give SpongeBob more personality and make him look friendly.
Step 4 – Add SpongeBob’s Clothes and Tie
Draw a horizontal line near the bottom of the rectangle to mark the top of SpongeBob’s pants. Above this line, add a collar by drawing two small triangles on either side of the body. Between the collar points, sketch a narrow, rounded rectangle for the tie.
Below the waistline, draw the square pants. Make sure the pants have straight lines and a sharp rectangular shape to contrast with SpongeBob’s rounded body. Add a belt by drawing a thin horizontal line with a small rectangle in the center for the buckle.
Step 5 – Draw Arms and Legs
On each side of SpongeBob’s body, draw two thin, noodle-like arms. Keep them simple and slightly curved. For the hands, draw small circles or mitten shapes.
Draw two straight lines down from the pants for legs. Add simple socks by drawing two thin stripes near the bottom of each leg. At the feet, draw shoes shaped like rounded rectangles with a small heel.
Step 6 – Add Sponge Texture: Holes and Details
SpongeBob’s body is full of holes because he is a sea sponge. Draw small, uneven circles scattered around the body. Vary the size and placement to make it look natural.
Add a few light lines around the edges and on the face for wrinkles and extra details. These help SpongeBob look more three-dimensional and lively.
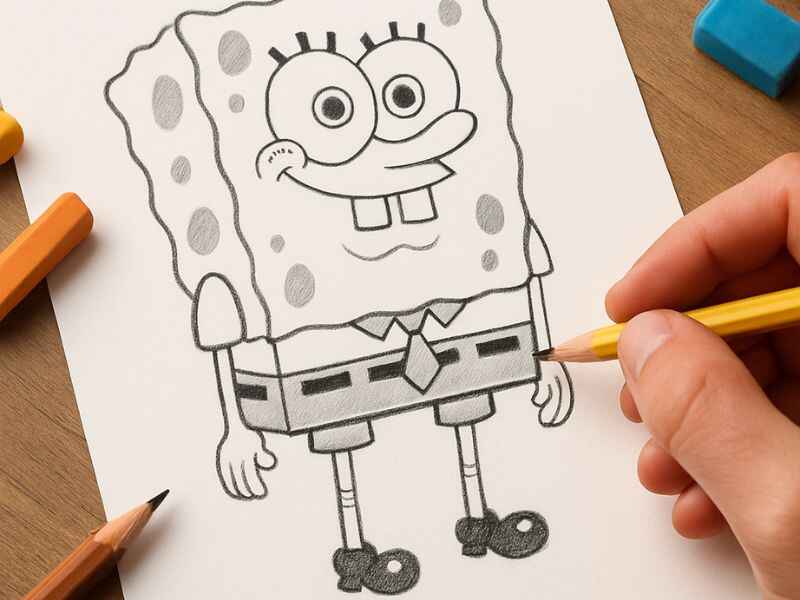
Step 7 – Outline and Color Your Drawing
Use a black pen or marker to carefully trace over your pencil lines. This will make the drawing clear and ready for color. Wait for the ink to dry, then erase any remaining pencil marks.
Color SpongeBob’s body bright yellow. His eyes are white with blue irises and black pupils. Color his pants brown and his shirt white. The tie should be red, and the belt black or dark brown. Shoes are usually black, and socks have red and blue stripes.
Tips for Beginners to Improve Their SpongeBob Drawing
If you are new to drawing SpongeBob, there are a few simple tips that can help you get better quickly. First, practice sketching basic shapes like circles, rectangles, and lines. SpongeBob’s body is mostly made up of rectangles and circles, so getting good at these shapes makes drawing him easier.
Using references is also very helpful. Look at pictures of SpongeBob from cartoons or books to see how he looks. This will help you understand his features and proportions better.
Don’t worry if you make mistakes. Drawing is a process, and erasing and trying again is normal. Use a soft pencil so you can erase easily and keep improving your lines.
Watching video tutorials can show you different ways to draw SpongeBob. Some tutorials focus on cartoon styles, while others try more realistic drawings. Exploring these styles can inspire you and help you find your favorite way to draw him.
If you want to go further, try practicing shading. Shading adds shadows and light to your drawing, which makes SpongeBob look more 3D. This step is optional but can make your drawing more interesting.
Frequently Asked Questions About Drawing SpongeBob
Can kids easily draw SpongeBob?
Yes, drawing SpongeBob step-by-step is simple and fun for kids. The basic shapes and lines are easy to follow, so even young artists can make a great drawing.
What materials work best for beginners?
A pencil and paper are the best tools to start with. Colored pencils or crayons are good for adding color. These materials are easy to use and affordable for beginners.
How long does it take to draw SpongeBob?
The time varies depending on your skill level. Usually, a simple SpongeBob sketch takes about 15 to 30 minutes. With practice, you can draw faster and add more details.
Can I draw SpongeBob digitally?
Yes, many artists use tablets and apps like Procreate or Autodesk Sketchbook to draw SpongeBob digitally. These tools allow easy corrections and vibrant coloring.
Are there easier versions of SpongeBob to draw?
Yes, simplified cartoon versions of SpongeBob exist for younger kids. These versions use fewer details and simple shapes, making it easier to draw and enjoy.
Why Drawing SpongeBob Is Fun and Good for Creativity
Drawing SpongeBob is a fun way to practice important art skills. When you draw him, you learn about shapes and proportions. SpongeBob’s body is mostly made of simple shapes like rectangles and circles. This helps you understand how different shapes fit together to make a full picture.
Drawing also helps improve fine motor skills. These are the small movements your hands and fingers make. Practicing drawing SpongeBob can make your hands steadier and more skilled, which is useful for writing and other crafts.
Another reason drawing SpongeBob is enjoyable is that it lets you connect with a character you like. Many people love SpongeBob’s cheerful personality. Drawing him feels like spending time with a good friend, which makes art more exciting.
Finally, drawing SpongeBob can boost your confidence. When you finish a drawing, you feel proud of what you created. This encourages you to try more art projects and build your skills over time.
More Fun Drawing Ideas for SpongeBob Fans
Once you are comfortable drawing SpongeBob, you can try drawing his friends too. Patrick Star and Squidward Tentacles are popular characters who live in Bikini Bottom with SpongeBob. Drawing these characters helps you practice new shapes and styles.
You can also create underwater scenes. Think about SpongeBob’s home under the sea. Add things like bubbles, coral, and seaweed around your drawings. This makes your pictures more lively and interesting.
Another fun idea is to make your own SpongeBob comic strip. Write a short story and draw SpongeBob and his friends acting it out. This lets you use both your drawing and storytelling skills.
You May Also Like:
How Did SpongeBob Die? Truth Behind the Viral Internet Rumor
Conclusion
Anyone can learn how to draw SpongeBob by following simple steps. This article showed you easy ways to create your own SpongeBob drawing. The key is to practice and have fun while drawing.
Keep trying even if your first pictures are not perfect. Drawing is a skill you get better at with time. Remember, enjoying the process is just as important as the final drawing.
If you draw SpongeBob, share your work with friends or family. Showing your drawings can make you feel proud and inspire others to try drawing too.
Disclaimer
This article is made to help you learn and have fun. The tips and steps come from what is known about SpongeBob and how to draw. SpongeBob and all the pictures belong to Nickelodeon and the people who made him. This guide is not connected to or approved by the SpongeBob creators.

Joseph Quinn is a writer and digital creator best known as the founder of FreakBobTime. With years of blogging experience, he blends technology, culture, and internet humor into unique stories and creative experiments. Through his work, Joseph brings back the playful, weird side of the web while making content that connects with readers worldwide.